Editor Overview
CCH Web Manager's intuitive editor interface makes managing your website content simple. This page introduces the three main sections that make up the content management system: The top navigation bar, the left menu panel, and the content area. Each of these sections plays an important role in website editing and maintenance.
Top Navigation Bar
Use the top navigation bar navigate your site, both by moving between different pages and by moving between different device views. Click a page to view it, or click a device to see how your current page looks on that device.
The navigation bar has controls to undo or re-do simple actions in the editor, save your current site, and preview or republish your site. The top navigation bar also has an indicator for when changes in the editor are saved.

NOTE: When you make changes to your site in the CCH Web Manager editor, they automatically save, and they won't publish on the live site users see until you click Republish. If you want to preview the changes before you make them live, you can find the preview link under the Share This Site button. Details below.
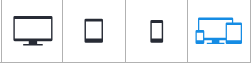
Switch Views – Top Navigation Bar
Responsive websites work on desktop, tablet, and mobile. For this reason, our responsive editor lets you preview the site in each of these views while editing. This lets you check how your site looks on different devices before you publish changes, ensuring that your customers have a positive experience no matter what device they are using to view the site.
To switch device views, click on one of the device buttons in the top navigation bar:
The different device views are not separate versions of your site. Deleting a widget in one view (for example, mobile), removes that widget from the entire site (desktop, tablet, and mobile). Instead of deleting, right-click on the widget and select "Hide from", then select a specific device.
Device previews do not always reflect precisely what you see on an actual device. Features like fonts, size of the device window, user interface and browser behaviour can all cause these previews to be inaccurate to various degrees. For the most accurate version of the site, check on a real device.
Undo/Redo Buttons
Click the Undo or Redo buttons as necessary when working in the editor.
Auto Save Icon
The check mark icon serves as an indicator of your current site progress and whether changes have been successfully saved.
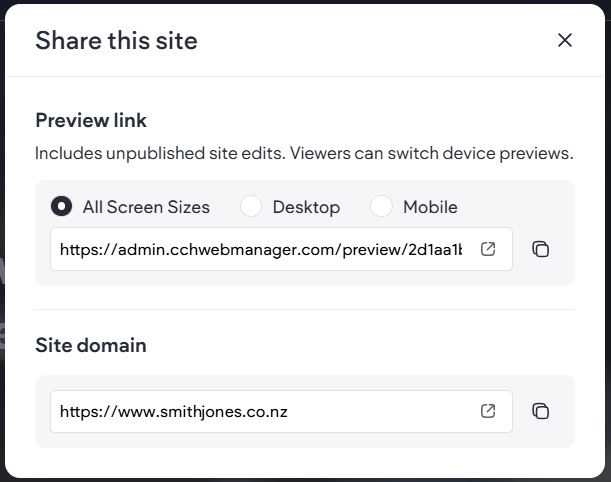
Share This Site - Preview Link

Click the Share This Site button. This will display a pop-up window.
Preview Link
Copy the preview link/URL to share a preview of the current state of your site, which includes unpublished changes/edits.
Use the selection options to change the preview device to show All Screen Sizes, Desktop or Mobile.
Once you view the preview link, you can change the device preview at the top of the window in all of the device options.
Site Domain
Copy the URL and paste it into your browser to view the live, published version of your site.
Preview Button
To preview your site before you make any changes live, click the Preview button. To close the Preview mode, click on the x icon in the top-right corner of the Preview Mode notification bar.
Republish Button
If you made any changes and would like to live, click on the Republish button to republish your site.
NOTE: Republishing your site will trigger a Site Backup. If you need to restore a backup your will need to email webmanager@wolterskluwer.com to discuss.

Left Side Panel
The left panel contains all of the widgets and features. Here you can find tools to edit almost anything on your site.
- Elements. - Under the Elements tab, drag and drop the widgets to add new content to your website pages.
- Pages. - Pages allows you to reorder, manage and create new pages in your site.
- CMS.
- Media Manager - The Media Manager allows you to upload and manage all media from one place.
- Business Data - The data you can connect to the widgets on your site.
- Collections - Collections function like databases that store lists of items with the same type of information.
- SEO/AEO. - Improve your site’s visibility and boost organic traffic by utilising the site’s SEO.
- Blog. - Use the blog editor to create, maintain, and publish articles on your site.
- More.
- Personalization - Set up the
Personalization Rule for a popup. See
Popups.
- Settings.
- Favicon & Social Image - Home screen icons, share images, favicons.
- Site Domain - This is the web address visitors see when they enter your site.
- Google Tools - To enable Google Analytics, Google Ads and/or Google Tag Manager on your site.
- URL Redirect - The URL Redirect feature lets you redirect specific URLs on your site to specific pages.
- Head HTML - Adding code to the head/body end.
- Site Languages - Increase your website's reach and engage a broader audience by configuring a multi-language site.
- Privacy Settings - Website privacy settings and setting up a privacy page.
- Manage Form Responses - Manage and delete responses received from a contact form.
- 404 Page - Customise the 404 page for your site.
- Progressive Web App (PWA) - A web application that enables you to deliver a native app-like experience to users on mobile
- Site Dashboard. - The Dashboard is your central location to view and manage your website
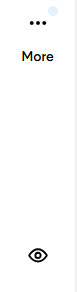
TIP: Show Hidden Elements
At any time, you can see all of the hidden elements on a page by clicking the Unhide Elements (Eye) icon at the bottom of the left panel.
NOTE: The Unhide Elements icon only displays if you have hidden elements in your site.
To unhide elements:
- Click the hidden element in the editor.
- In the left panel, click Unhide Element (Eye). Hidden elements are now displayed.
- Once hidden elements are displayed, to restore them, click on the element and then click Yes on the message.
NOTE: If you are using the unhide element feature and it does not reveal an image on your site, your image might need to be added and uploaded.
Content Area
The Content Area is where you can move or add widgets such as text and image widgets, or click and edit to content in existing widget areas. The content area allows you to add, edit and delete images, text, links, buttons, and more. The Content Area uses a series of columns and rows to position your content. To learn more about arranging your content please visit our article “Arranging Content”.